
A Greater Victory
by Steve Carey, published by Revolution Games.
A review copy was provided by the publisher.
(A video version of this review is also available.)
This is the latest installment in Hermann Luttmann’s Blind Sword series on the American Civil War. I’ve played the first two, Stonewall’s Sword and Thunder in the Ozarks, and now I’m skipping to the end. It’s interesting to see how the system has been changed and refined. Sometimes to fit the particular battle, but I think sometimes to just improve the experience.
Like many other series, Blind Swords has moved on from a simple rulebook for each game to the common series rules plus Exclusive rules model. This has the upside for veteran players of making all the changes from the basic system easily accessible. But it’s still a drag to have two rulebooks. This is obviously not a problem confined to this game, and I’m not sure just having a single rulebook is the answer. In theory, I like the idea of a single rulebook with exclusive rules highlighted, but I imagine that it’s difficult to highlight rules that have been dropped. In any case, the rules load is not heavy here.There are 14 pages of Series Rules, and just six pages of Exclusive rules, with maybe a page or two more scenario specific rules for each scenario.
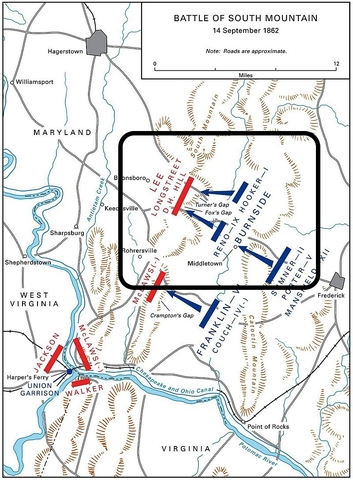
A Greater Victory plays out the battle of South Mountain, September 14, 1862. For fans of history, this engagement has a few outstanding issues. It’s the result of the famous recovery by the Union of a copy of Special Order 191,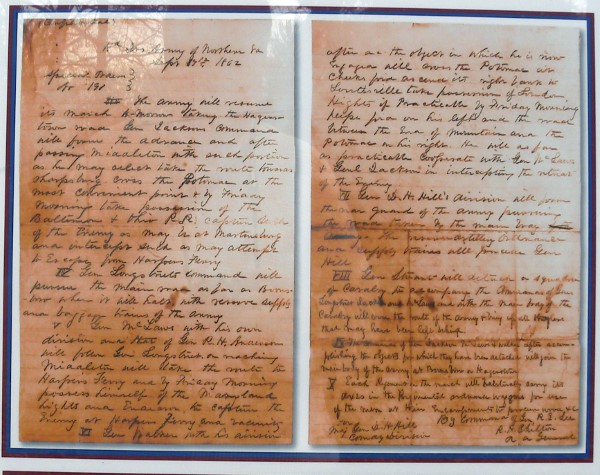 wherein Confederate General Robert E Lee detailed his plans to split his army in two, with one half headed toward Harper’s Ferry, the rest at Boonsboro, near where our battle takes place. Also surprising, is that Union General George McClellan moved decisively to engage the latter half of Lee’s army. McClellan is well known for dragging his heels and demanding twice the amount of troops needed to get most jobs done, but here he acts decisively and competently. Spoiler alert: after winning the battle, he doesn’t follow up aggressively, leading to the fall of Harper’s Ferry and Lincoln dismissing him.
The actual engagement featured battles for three gaps in the mountainous terrain. In A Greater Victory, we see two of those battles as the third was a minor action and would have extended the map further south (if I have my geography right). As with previous Blind Swords games, the victory point locations are asymmetric with different values depending on which side controls them. There are quite a few across the map, but the biggest ones are at these two main points, Fox’s Gap and Turner’s Gap. Turner’s Gap is the big one as it’s the big road between the mountains, and it grants the most victory points in the game.
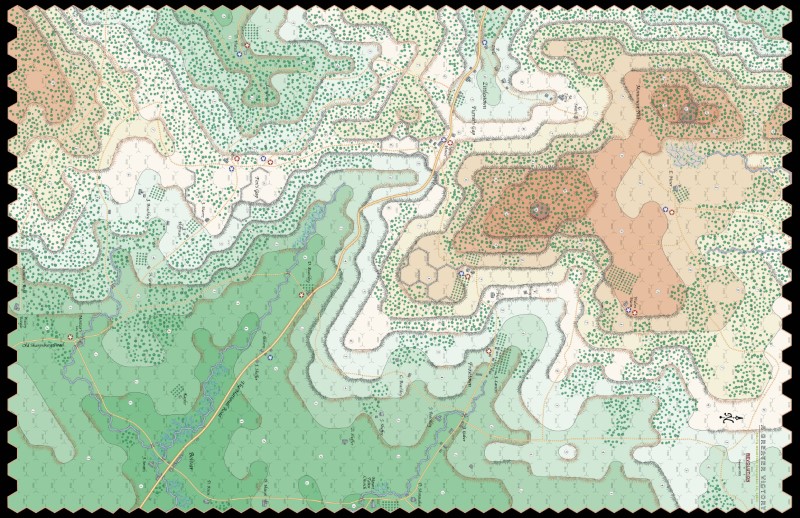
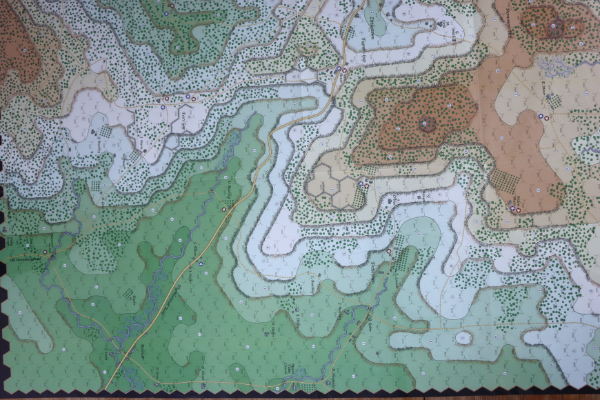
Speaking of the map, this is the first map in this series not to be drawn by the late Rick Barber. Instead we have Edmund Hudson making the map in a definite Barber style. I’m not sure if this map has been hand-drawn like I assumed Rick Barber maps were. It appears a little more like computer art to me. That’s not a bad thing. If you felt Barber’s maps were a bit busy or a bit loud, you’ll love the new style. It features a slightly more muted colour palette and a less busy line-style. I miss the Barber hand-lettering. Here Hudson has used a script font. If it’s not to be hand-lettered, a less fussy typeface might have been better.
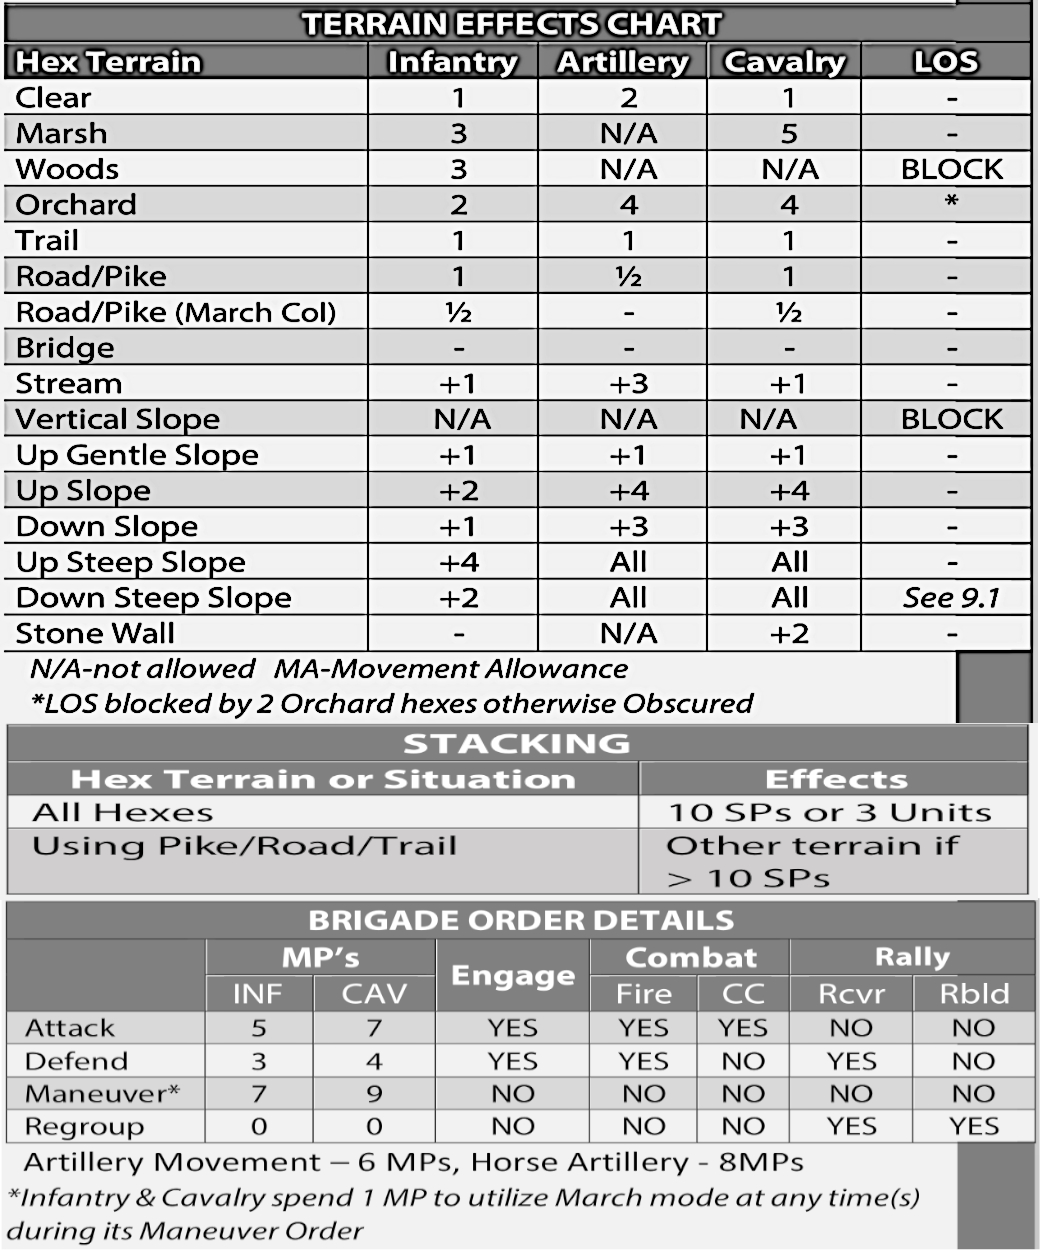
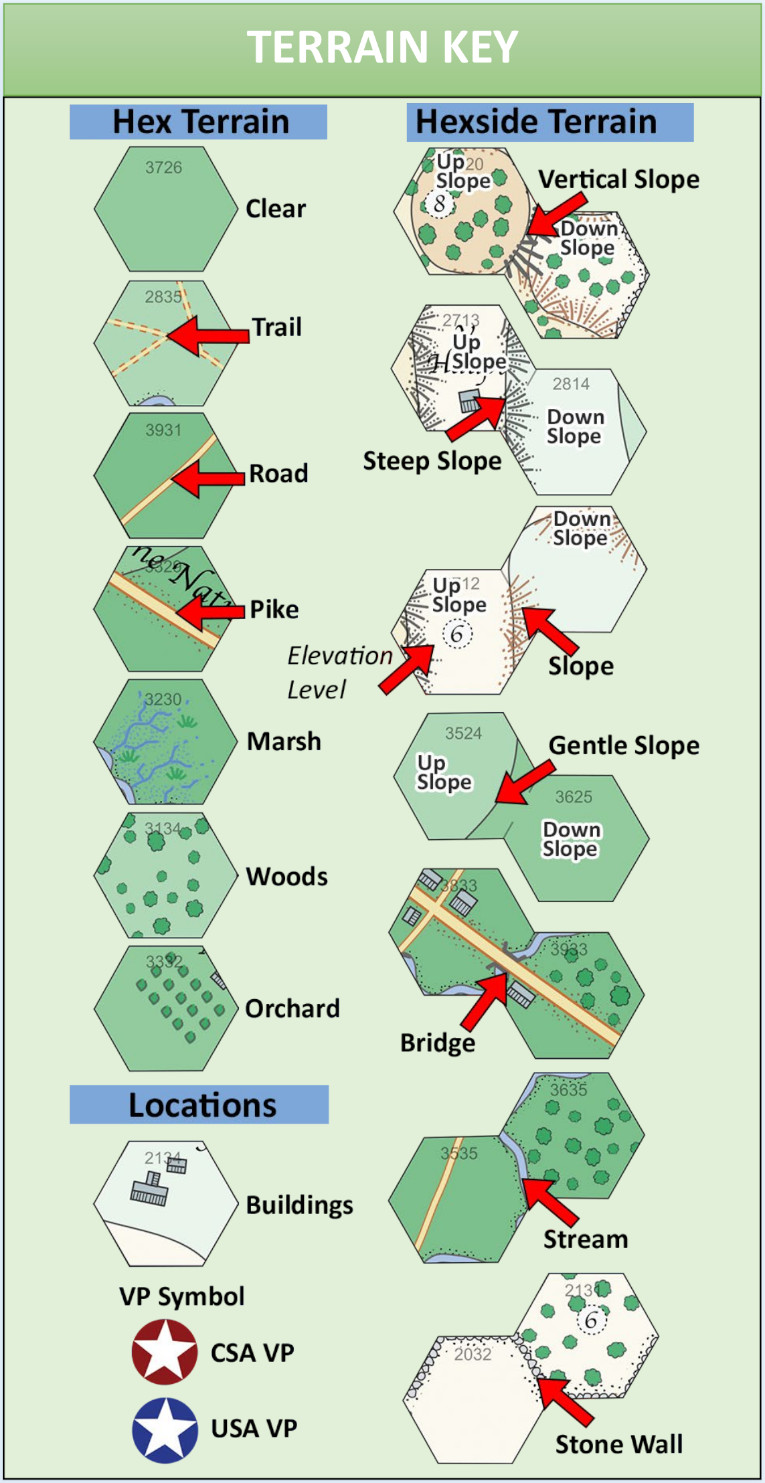
It’s a one map game, but there’s no lack of terrain. It’s not called South Mountain for nothing: there are 11 elevation levels on this map. And given how steep the terrain is, several of the Exclusive rules deal with the effects of this terrain. There are 4 types of slopes: Gentle, Regular, Steep, and Vertical. In regular Blind Swords games, crossing a regular slope doesn’t add anything to the movement point cost. But here, crossing even a gentle slope costs an extra MP. Regular slopes cost more going up or down, and same with Steep slopes. And vertical slopes are impassable. As well, the normal combat shift for firing over troops is not used here as the fire is so far over the heads of the intervening units.
I’ve explained the Blind Swords system before when talking about the first game, Stonewall’s Sword. But for those who missed that, here’s how it all works.
The map scale is 150 yards across each hex and each turn is 30 minutes of real time.
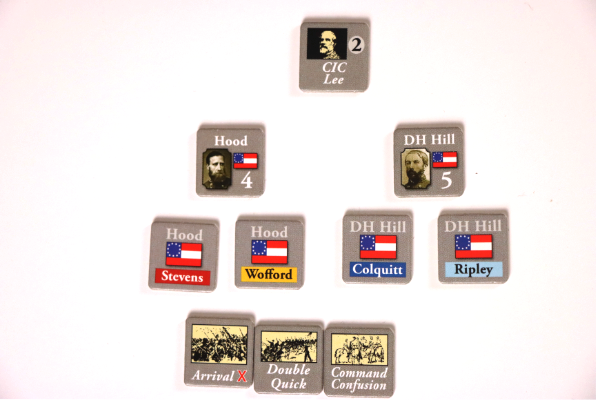
The units are regiments or battalions, and each unit is affiliated with a parent brigade. In turn, each of those brigades is usually affiliated with a parent division. The only counters that appear on the map are the regiments and brigades. The counters for the brigade commanders and division commanders are kept off-board and used as part of the chit-pull activation system.
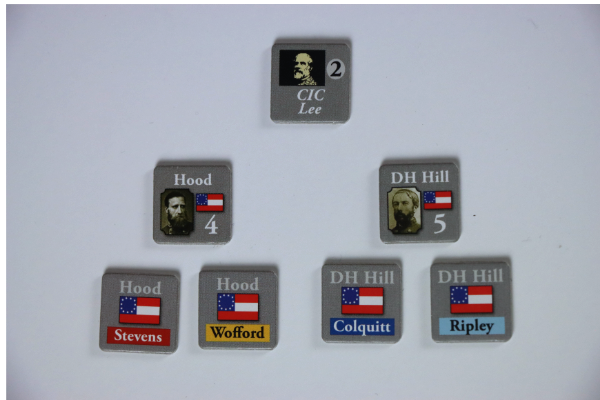 Command structure: Army -> Division -> Brigade
Most units are two step with a step on each side. Single step units are blank on the back. Cavalry units vary from game to game in the Blind Swords series. In this game, the front is the mounted side and the reverse is the dismounted side. So dismounted, they become a single-step infantry unit.
 Left is front, right is verso
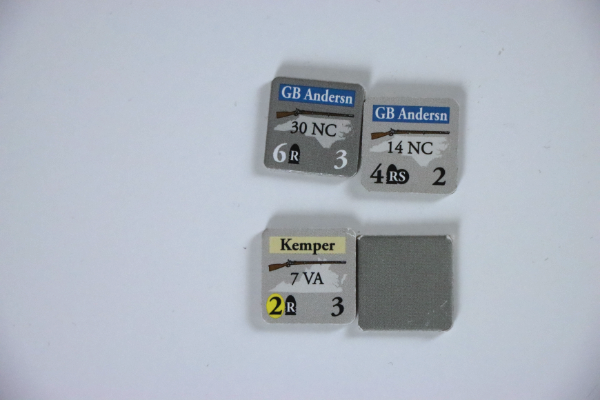
Along the bottom of the unit counters are two numbers. On the left is the Unit Strength, and on the right is the Cohesion rating. The unit strength is used for both firing and close combat, the cohesion rating is used in melee and when being attacked. There’s also a small symbol denoting weapon type which determines effectiveness at various ranges, and at the top is the name of the brigade the regiment belongs to.
Cavalry counters are similar to infantry. Artillery works a little differently in that the units don’t belong to brigades, they work independently at the beginning of each turn. More on that later.
The only other thing to mention about the units is stacking limits. You can stack up to three units in a hex with a maximum of ten total strength points. Artillery strength points are calculated a little differently for stacking purposes (there’s a little chart for that) and cavalry may not stack with infantry or artillery.
The other main counters in the game are the brigade leaders, division leaders, and event chits. The brigade leader counters are only used to keep track of which brigades have been activated each turn. The division leader counters (along with a Commander-in-charge counter) go into the chit pull cup along with the event chits. The mix of event chits and leader chits that start the game are spelled out in the scenario setup for each of the three scenarios. (There are two smaller scenarios and then the entire battle.) Then as you proceed through the turns, more leaders and events may be added to the mix, or some events or leaders may be withdrawn.
So here’s how a turn works. First up, the cup is stocked with chits. Both players put their available leaders in the cup as well as choose one event each to put in the cup. They then take the rest of their event chits and choose one more randomly to put in the cup. (This increases to two later in the game.)
Once the chit cup is stocked, it’s the artillery phase. Player’s take turns activating one hex worth of artillery at a time and either firing it or moving it until neither player has any left that they wish to use. Then there’s a new step from earlier iterations of the Blind Swords system. At the end of the artillery phase, each player can choose one hex with artillery to rally or attempt to rebuild. This used to happen when nearby infantry was activated. This is cleaner, but only allows a single hex per turn to rally.
Then we start the meat of the game, the chit draw phase. A chit is drawn from the cup. If it’s an event, the owning player either holds it for later or plays it right away. Events can be things like an extra fire attack, an extra rally attempt, or Command Confusion (where you get to mess with your opponent’s orders for one of their brigades).
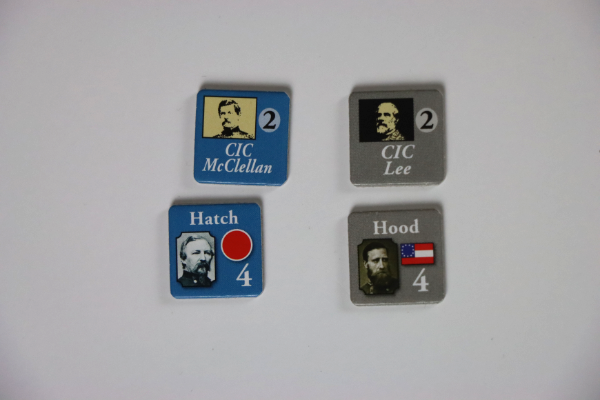
If a Commander-in Chief chit is pulled, that side may get an extra activation. The CinC chits in A Greater Victory work a little differently than in some Blind Swords titles. First, they don’t show up in the counter-mix until part way through the game: Lee arrives at 1PM and McClellan at 3:30. Second, they are not automatic activations. Both have an activation number of 2, meaning you have to roll a 2 or less to get to use them. So even when drawn, you only have a 1 in 3 chance. But the big difference is that the chits don’t automatically go in the cup. In other BLind Swords games I’ve played, the CinC chits go in the cup each turn, once they are available. In A Greater Victory, they are treated like event chits. That means they only end up in the cup if a player chooses it as their key event, or if it’s chosen as one of the one or two random events. I talked to designer Steve Carey about this decision. He said neither commander had much active input in the battle. Lee had fallen off his horse the day before and wasn’t in great shape. And McClellan was McClellan, not the most dynamic field general.
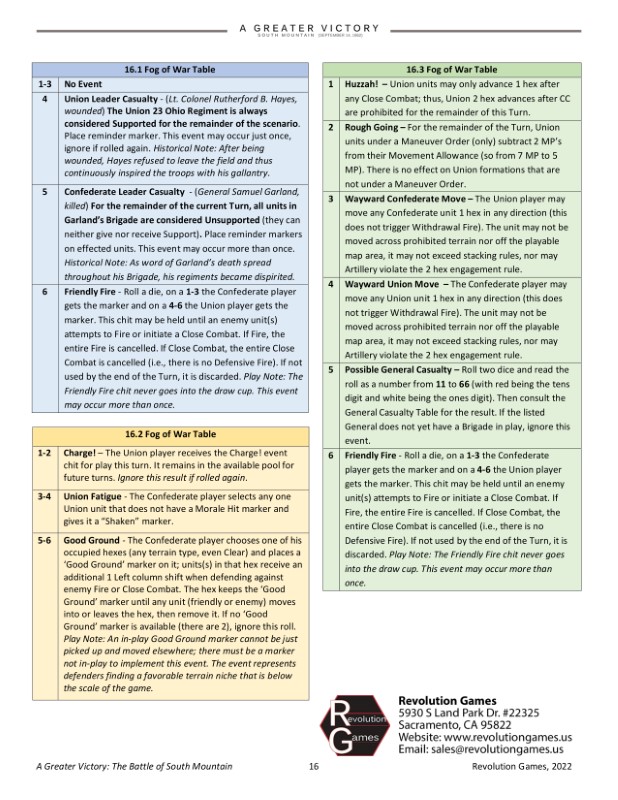
There are two generic event chits that also go in the cup each turn. Fog of War means you roll for an event on the FoW table. Fortunes of War is more dangerous. When this chit is drawn, the next chit drawn does not happen, no matter what. You may lose the activation of an important brigade if this comes out at the wrong time.
Back to the sequence of play. If the chit pulled was a division commander or a CinC, then the owner rolls to see if they get a full activation or a limited activation. Like the CinC chits, each division commander has an activation rating on their chit, generally between 3 and 5. You have to roll that number or less to get a full activation.
If it’s a limited activation, you can’t do much. You choose one of the brigades of that division and can only do fire attacks with those regiments. No movement, no rally, no close combat. Then you flip over that regimental commander’s chit and that regiment is done for the turn.
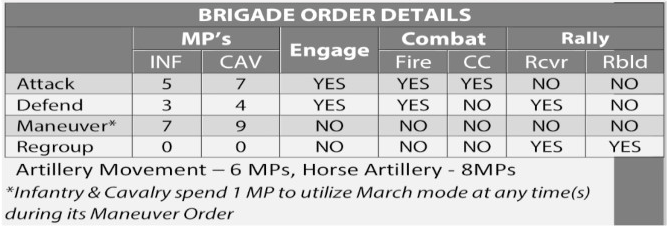
If it’s a full activation, the player then has to decide what sort of orders to give the Brigade: Maneuver, Attack, Defend, or Regroup. The order is the same for all regiments in the activated brigade. Each order allows a different amount of movement, and a different amount of engagement, and different recovery capabilities. Maneuver allows the most movement points, but you aren’t allowed to fire at the enemy nor move adjacent. Attack lets you move less, but you can both fire and engage in close combat. Defend and Regroup are the only options that let you shake off any bad morale effects or give you the chance to regain a lost step.
Interestingly, the sequence for actions for an activated brigade is fire attacks first, followed by movement, then close combat. Finally rally, if ordered. So an activated regiment can fire on an enemy unit, then move adjacent and declare close combat. The defender gets defensive fire, and then the melee is resolved.
Movement is fairly basic. Each of the orders give infantry units a different amount of movement points to spend. Different terrain types cost different amounts of mps. As I mentioned earlier, the map is all up and down with various degrees of slope. So off-road movement costs a lot of extra mps.
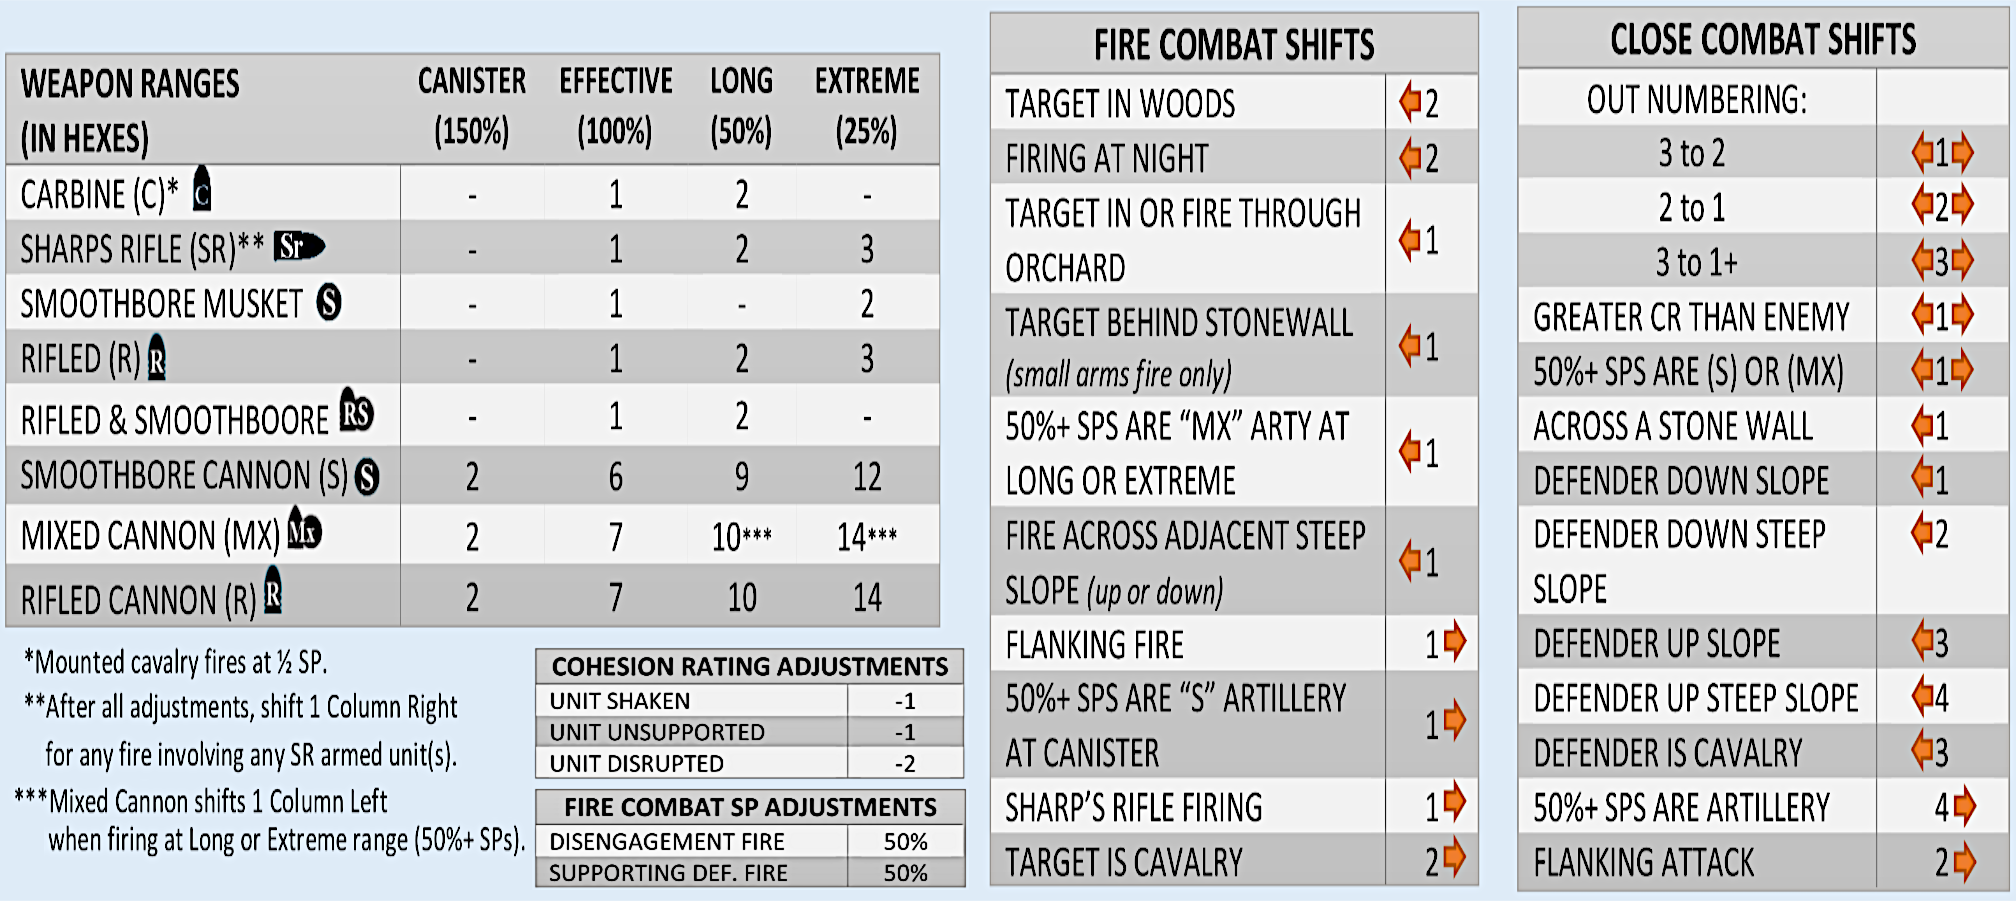
The combat system uses the strength points on the firing unit. Range and weapon type play a role in determining if you use 100% or your SPs or 50% for longrange. Once you have your total SP column, then there may be column shifts for target terrain or weapon type.
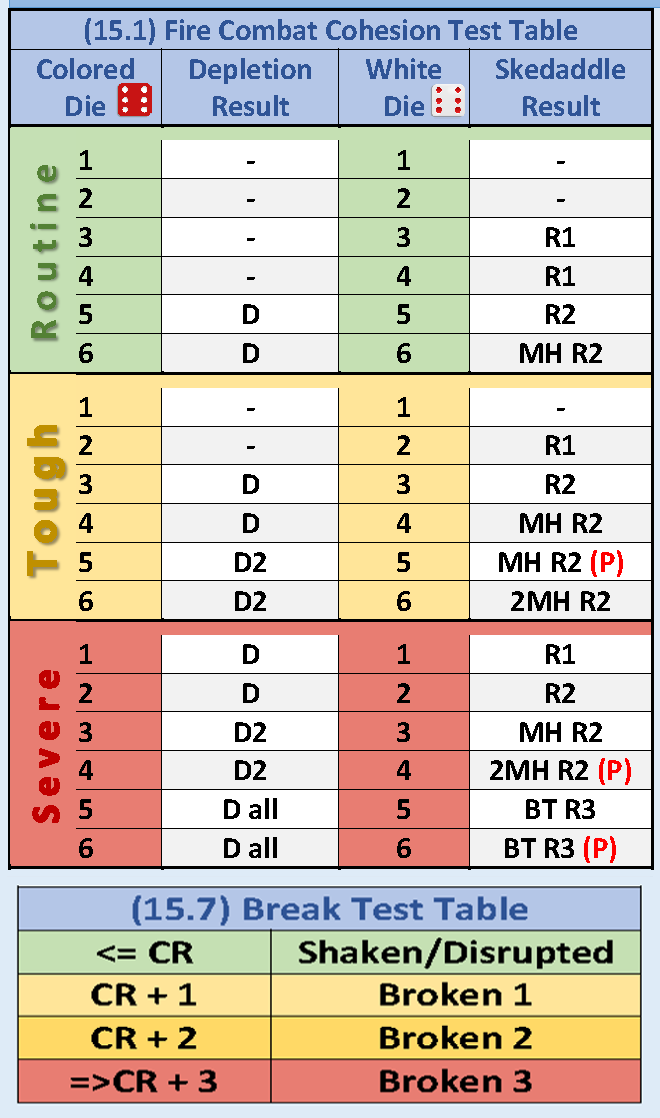
Once a final attack column is determined, you roll 2d6 of different colors. But rather than a range of 2 to 12, you read them as digits, giving a range from 11 to 66. You consult the CRT to see if you have had any effect. The CRT is ingenious here as one roll gives you a range of effects on each column. That range corresponds to the possible cohesion rating of the target. Lower cohesion ratings get hit more often and harder.
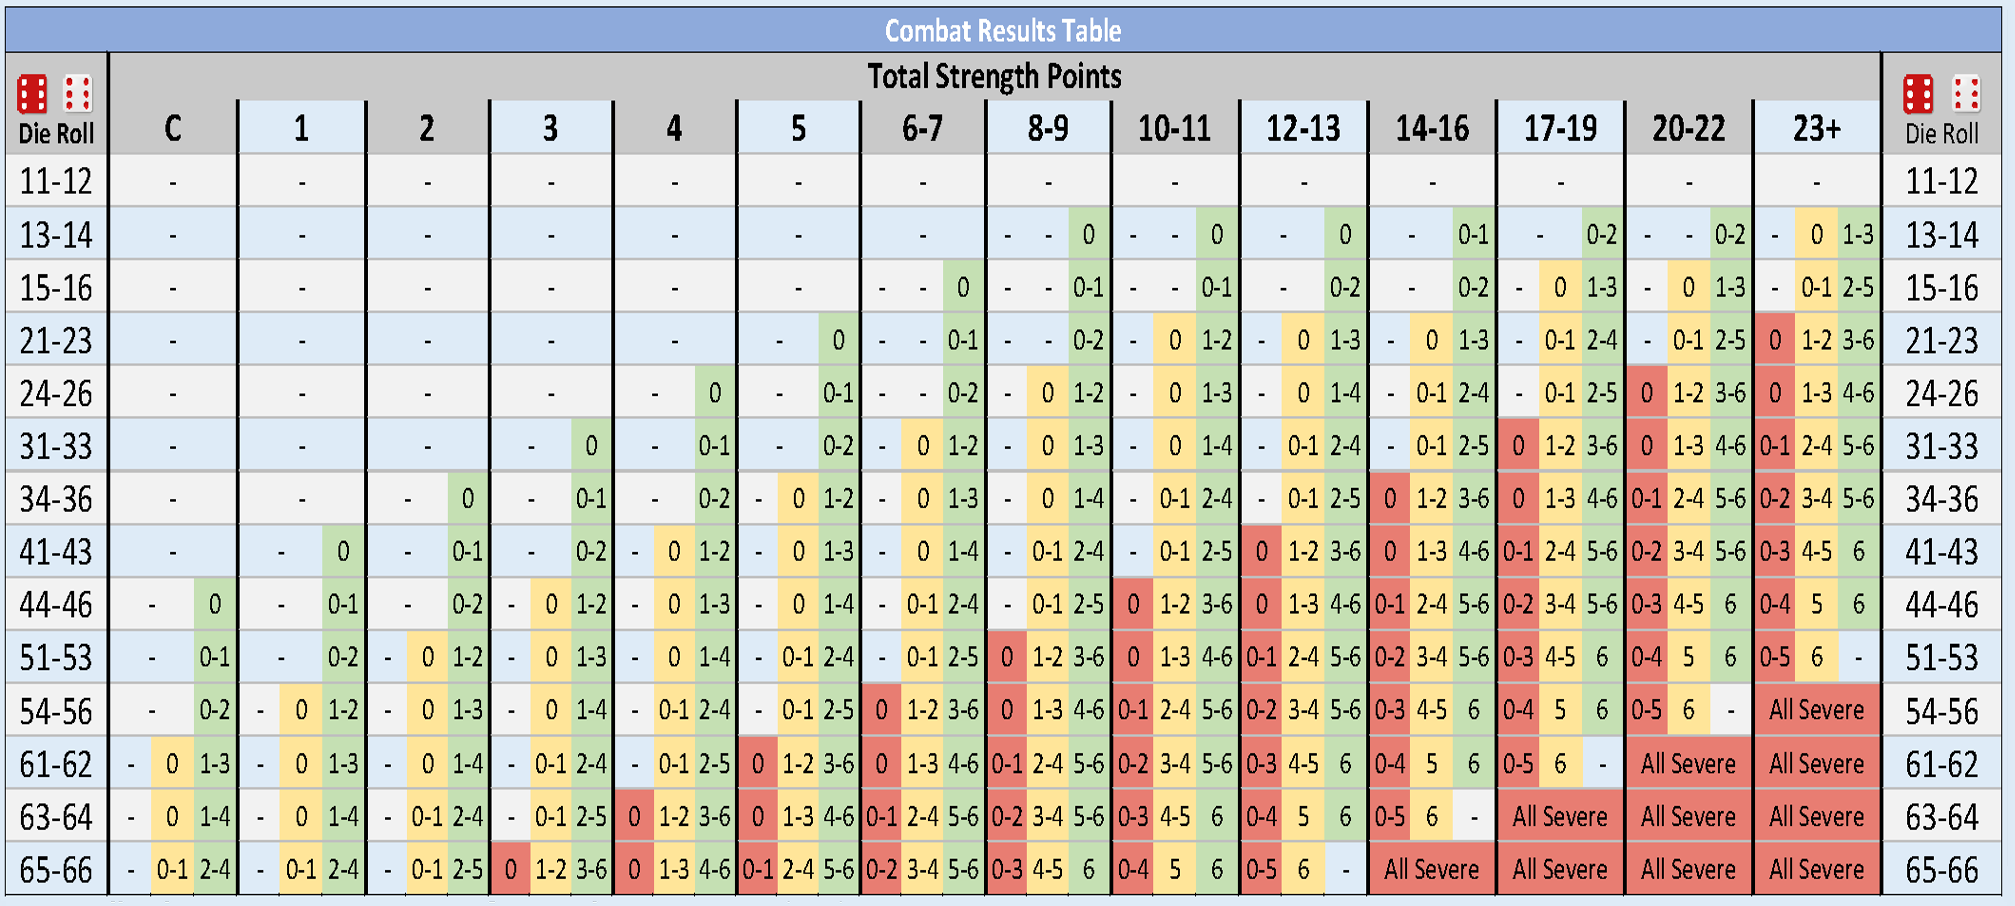
Having determined how hard of a hit you generated (if any), green yellow or red, you roll again on the cohesion chart. The colored die will give you a depletion result (target may lose a step) and the white die will give you a skedaddle result (defender may retreat). If the defender retreats, you’ll have the option to advance after combat. If a unit is facing losing its last step, they make a roll vs their cohesion number. If they fail, they end up offboard on the broken track, with a chance to return later.
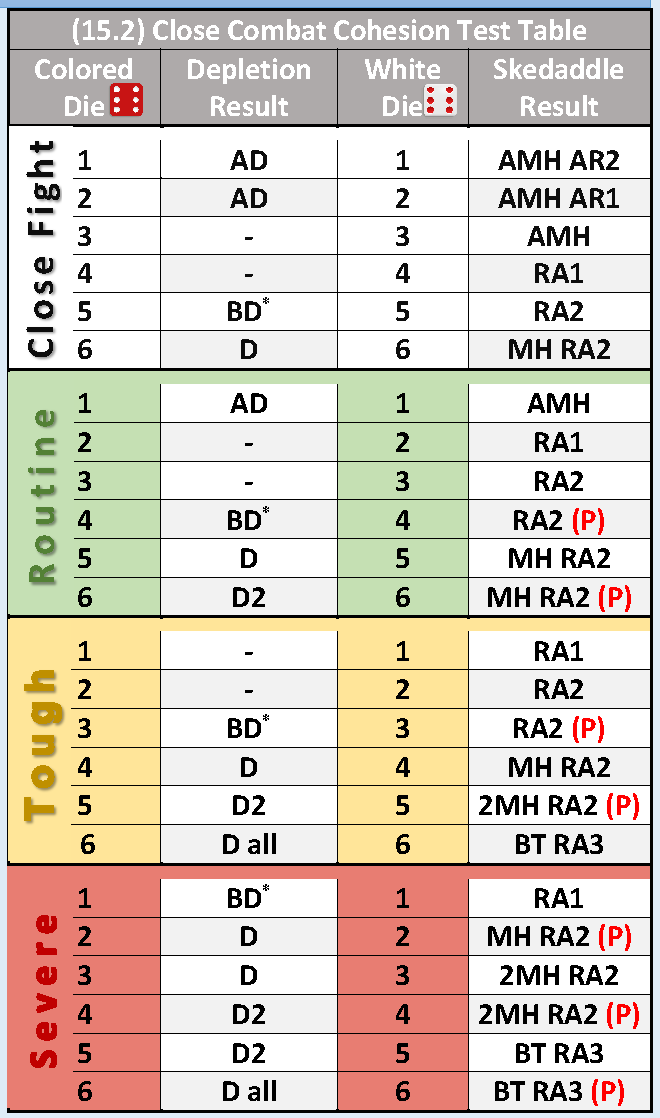
Close combat works almost exactly the same. But first the defender gets to fire on you before you engage. You then attack with whatever SP strength you have left. Critically, the column shifts are different for CC than for firing. You get shifts for having substantially more SPs than the target and for higher cohesion. But you lose shifts when attacking upslope. Finally, with CC, there is always a second roll the cohesion tables, even if you got no result on your attack. If you got no effect, you roll on a special cohesion table and there you’re as likely to lose a step or retreat as the defender.
I like this combat system and the dice as digits system. It gives the designers a non-bell curve table, but with many more results than a 1-6 or 1-10 table. And really interesting that the same CRT is used for both fire combat and close combat; just the dice roll modifiers are different.
When units are hit, they may lose a step or may just take a morale hit which degrades their capabilities slightly. After the fire and movement steps of an activation, there is a rally step where (if you chose a defend or rebuild activation), you’ll be able to remove some of those morale hits or try to rebuild lost steps.
Once you’ve gone through these steps for all the units in the active brigade, that brigade marker is flipped to its used side and another chit is drawn. And so on until all the chits have been pulled from the cup.
At the end of the turn, there may be a few VP determinations (depending on the turn), and then all the brigade counters are flipped back up and units on the broken track are moved one space forward until they are in the available box where they may be rebuilt. Move the turn record marker, check for reinforcements, and refill the chit cup for the next turn.
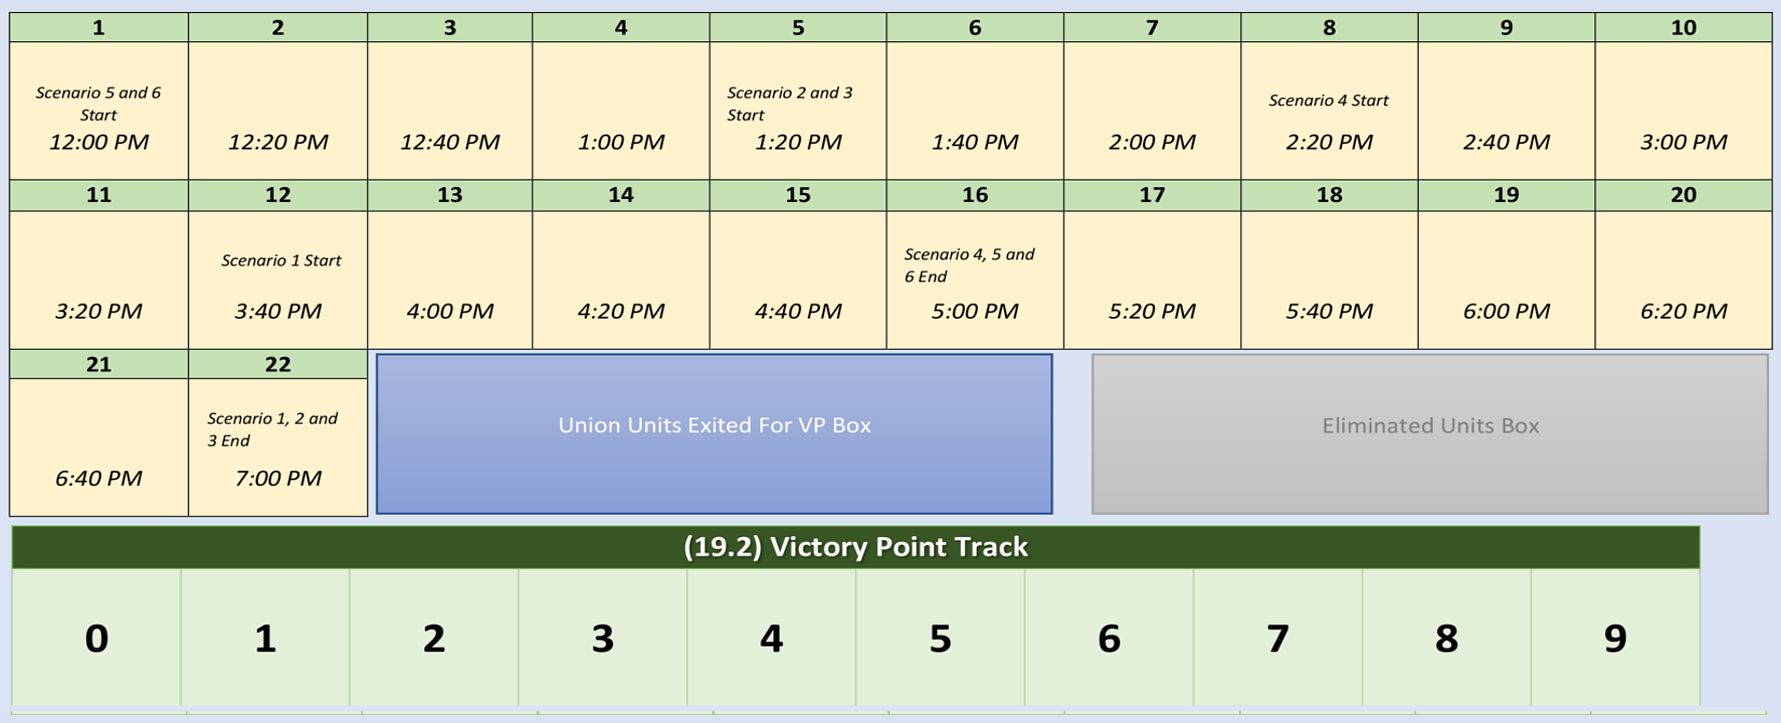
And so it goes, back and forth until time runs out. Victory is awarded both for losses inflicted (every unit in the eliminated box or anywhere on the broken track at the end of the game counts against you) as well as certain VP hexes. The VP hexes have various values, usually just one or two points, but they aren’t all symmetrical. That is, some give one point for one side, but none for the other. There’s also a few that give one side or the other points for control part way through the game. For example, there’s points for holding Fox’s gap at 10:30 AM. This incentives the rebels to hold it at least until then. They will very likely lose it over the course of the game, but this victory condition means they shouldn’t abandon it immediately. And of course, Turner’s Gap is worth 10 VP to whoever controls it at the end. It’s possible the Confederates could lose Turner’s Gap and still win, but probably unlikely. It’s more possible they could hold it, but still lose because the North scored more casualty VP and picked up a bunch of the other small VP locations. So it’s a matter of trying to be everywhere at once.
I almost forgot, there’s a killer event chit that enters the game about a third of the way through and then leaves at about the ⅔ mark. It’s called indecision. Like many battles, this was a confused thing, especially given the mountainous terrain and lack of line of sight for commanders. When the indecision chit is drawn in a turn, it reduces all the activation numbers for commanders by two for the rest of the turn. So after it is drawn each turn, there will be many more Limited Activations and fewer Full activations. But you never know when it will come. So on turns when it’s still in the cup, you want to get your most important activations done as soon as possible to avoid the indecision.
For a similar stretch of turns, the artillery must rest. Each player can only use two artillery units per turn for the middle third of the game. This really diminishes the effects of artillery in the game to the final third as you’ll be using the first third just to get your guns to position.
Another new twist to me in this series is that each of the three scenarios has its own Fog of War chart. It’s a small thing, but the two smaller scenarios have Fog of War events that aren’t on the full scenario, allowing the designer to put in a little more flavour specific to that part of the action.
But the full scenario is the main event, of course. The Rebels have just enough to try hold Fox’s Gap. Both sides will likely be shredded in the south regardless of who wins. Just as you feel you’re running out of units, the reinforcements start coming in. But slowly, as the Indecision chit may slow everything down. Depending on how you assign Limited Activations when they come up, you will likely end up with some formations that only barely make it to contact before the end of the game.
The Union player has to decide how much to throw at Turner’s Gap and how much to use trying to capture the outlying VP spots. The Confederate player has to counter those choices, but also has to finesse how much ground to give up vs how many losses to take. The rebel forces are more brittle than the Yankees, but the rebels are almost always uphill from the attackers.
I really liked this game and continue to play it. The series has come a long way since Stonewall’s Sword. I really like the reduced number of event chits in the cup each turn. You still get the full range of events, but you never know what’s coming each turn. As well, the event chits for each side vary a bit more from previous titles I’ve tried.
Each game I’ve played in the series handles cavalry a bit differently as well. There’s not much of it here, but I appreciate it being able to be dismounted and used as infantry.
What’s really great about this game is its reinforcement schedule. Both sides start out with very little. The Confederates start with nothing that can defend the north part of the map, but the Union only has a couple cavalry units to try grab victory locations there. Slowly more brigades and divisions begin to trickle in on both sides, filling up the chit cup turn by turn. In the north half of the map, the two sides can reach the prime locations at about the same time. In the south, it’s more a case of how the fight for Fox’s Gap plays out and when the Union can break out, spending part of their force to add in at Turner’s Gap, and part to try pick off a couple small VP spots.
The rule about certain Union divisions only being able to play on the north side of the main road, and some only on the south was a design decision to keep the Union from being able to mass all their troops in one place. Reading the rules, it rubbed me the wrong way, but in practice, it works great. It forces the initial fight at Fox’s Gap and then later makes it a sprint for small fights for some of those VP locations. Crucially, all units can stray two hexes either side of the road, and Turner’s Gap VP hex is right on that road. So you really don’t worry about it for the main fight for Turner’s Gap.
Steve Carey has done a good job here. The research and decisions on unit strength are deep. You’ll notice that the strengths vary widely. Apparently there was a real problem with stragglers after 2nd Manassas (which happened just before South Mountain). Especially on the Confederate side, many units were under strength due to stragglers and missing men that would eventually return before Antietam, which was looming.
I’d be interested in a version of this game where the reinforcement schedule was a little more random, maybe a bit like Guns of Gettysburg if anyone knows that game. But that’s a small quibble. And why tinker with something that feels balanced? In my 3 plays of the full scenario, the winning VP count was always within 5 of the loser. That might just be the way I played, but it feels fairly tight to me. I can certainly envision a play where one side or the other might throw in the towel early, but it never happened to me.
So I definitely recommend this game. The components are what you expect from Revolution. Good ⅝ inch counters by Charlie Kibler and a paper map in a new Rick Barberesque style by Edmund Hudson. And there’s been an upgrade in rulebooks. While the Series rules are still in black and white, the Exclusive rules are full colour on glossy paper. There’s even an illustrated example of fire combat. More examples of play would be welcome. And a great package design by Mark Mahaffey.
So check out A Greater Victory. The boxed edition is $85, or if you want to save a few bucks, the ziplock version is $70.
Oh, I should also mention there’s a very good VASSAL module. It takes a bit to figure out the intricacies of filling the cup, but once you get that down, it’s very smooth to use.

Add comment